


Friends Who Laugh...Last! - Art Impressions

With Love Sprinkled on Top - Tiddly Inks

Sharing A Cuppa - Lili of The Valley

Floral Fresh Greetings - Lili of The Valley

Spring Time Birthday - Lili of The Valley

Birthday Girl - Lily of The Valley

Valentine Kitty - Tiddly Inks

Snail Mail Greetings - Tiddly Inks

This is a Gloop - Lettering Delights

Milestone Birthday - Various

Snowy Christmas - Lili of The Valley

Christmas Card - More Poinsettias - Various

Christmas Cards - Comfort and Joy - Various

Christmas Card - Robin's Wishes - Penny Black

Christmas Card - Mischievous Cat - Penny Black

Winter Snow Fun - Penny Black

Got Chocolate? - Tiddly Inks

Congratulations Card - Silhouette Store

A Home Without A Cat? - March 2016 - Art Impressions

Valentines/Anniversary - February 2016 - SVG Cuts

Birthday Boy - February 2016 - Lettering Delights

Thank You Card - January 2016 - Tiddly Inks

Flying Away - Birthday Card - January 2016 - Penny Black


.JPG)
.JPG)
Valentines Card - February 14, 2015
.JPG)
Friendship, Valentine, Birthday Cards - February 10, 2015
.JPG)
It's a Boy Birthday Card - February 6, 2015
.JPG)
Valentines is Coming - Pop Up Card - January 27, 2015
.JPG)
Early Bird? - January 20 - 2015
.JPG)

Snowmen! - January 14 - 2015
.JPG)
Owl Family Cards - January 13, 2015
.JPG)

December 22 - 2014
.JPG)

December 3, 2014 ~
Snowflake Box Cards. Click the link for the full post with more pictures and links.
.JPG)

November 18 ~ 2014
Time to post some stamped images cards again - These use Penny Black stamps... both are from the 'Bubbly' Set
.JPG)
The 'Miss You' is an old ProvoCrafts clear stamp. The pattern paper is also an oldie from Provo found in the 'stash' The dog was coloured using InkTense pencils by Derwent.
.JPG)
The sentiment stamp is a newer one by Bo Bunny and the patterned paper is by Forever in Time. I used an Emagination punch for the decor edge and I coloured the hedgehog using Prisma Coloured pencils.

November 10 ~ 2014
I wanted to send a card bearing warm winter wishes to someone I care a great deal about, and when I saw these little owls...I knew I had found the right design! It turned out cute and the recipient liked it and it greets her everyday when she arrives home from work. Perfect!
.JPG)
I added some chalk, coloured pencil and glitter glue details and some items are slightly popped up with foam squares, while some of the leaves are crumpled and formed to create interest.
All the bits and pieces are by Designs on Cloud 9 (except for the cloud that was a last minute hand cut addition) These are the files I used : (images are linked)
Pictures/previews/links for this page have been removed due to designers retiring and stores closing

October 28 ~ 2014
Making cards for my lady friends is always a lot of fun, only when I have to send them far away, it gets a bit more difficult to keep it flat enough for easy mailing, while still keeping it interesting with a layered look. I'm pleased with how these 2 cards turned out!
The first one was done on a cream card base I added stamping and alcohol ink sprays to the background for interest. On top of that I layered a heart doilie cut out. In retrospect it would have been nice to emboss that sold heart area.
.JPG)
The next card was done on a white base and I cut a more lacy heart for this one. I like lacy cuts!
.JPG)
I finished both cards with a handwritten sentiment on the hand cut banner, and a few sequins to add a bit of dimension, without adding bulk. I used the 'Heart Doilies' cut files
October 14, 2014 ~
I recently received a lovely piece of mail - Create A Smile Stamps had a give-away on their Facebook page and I was the lucky random winner ! (that does not often happen!) so I was doubly pleased when my 'win' showed up in the post box, complete with a lovely card from Christine. Thank you so much!
.JPG)
The very next day I set to playing with these- high quality!- stencils. I used chalk to create backgrounds for a couple of cards I had planned.
A pink. purple and orange one with "Waves"
.JPG)
And a multi coloured star one with "Wave Of Stars" In both cases my cards are larger than the standard A2 so I re positioned the stencils to do the bottom bits. That was very easy to do btw.
.JPG)
Now my cards bases were ready for the cut file images.
.JPG)
.JPG)
I used the hippo and penguins from Designs on Cloud9's 'Circus Animals'
And the greeting from 'Birthday Train'
Pictures/previews/links for this page have been removed due to designers retiring and stores closing
On the inside I scattered stars cut using stars in the Circus Animals set, as well as using punches. A little glitter glue here and there and my colourful Happy Birthday cards are all done
October 13, 2014 ~
Another box card. I like it....but I think I would change a couple things next time such as not using yellow for 'Christmas' and maybe using patterned paper for some of the panels....hmmmm maybe.... I do like the embossed bits though!
.JPG)
I added a little cut out to the inside of the first layer. It looked a bit bare without it.
.JPG)
I really like the files in this Christmas Box Cards Collection

I think I should try the snow globe next...
October 1, 2014 ~
Time to make a definite start on those Christmas cards! I really enjoyed making this box card. What took the longest was waiting for the glitter glue to dry!
.JPG)
Close up of that front poinsettia.
.JPG)
The wreath peeking out from behind the flower is by Hambo Stamps and the paper is from Recollections 'Sugar Plum' paper pad.
I sprayed the cut outs with alcohol inks to add more interest to the otherwise flat colour. Initially I added dimensional fabric paint for the 'berries' , but I did not like the results - the berries were too uneven to my liking- so I added the sequins over top, which I must prefer in the end.
.JPG)
This card may end up as a decor item in my house while I make new ones to actually send out!
The file I used is from SVG Cuts the Christmas Box Cards Collection
Well I know it's only (almost) October, but this little penguin just had to be made into a card...and then into a fridge magnet!
.JPG)
The paper on the bg is just some snowflake stationary I've had for quite a few years and the snowflake stamp has been in my collection " for forever". I coated the light blue snowflake with Versamark ink and a shimmery clear embossing powder and added tiny dots of shimmer glue for more little 'flakes' I like an understated shimmer/glitter on my projects. The sentiment stamp is an old ProvoCraft clear stamp and is a good old standby for me.
.JPG)
For the magnet I duplicated the snowflake and stacked the flakes with foam tape for added dimension. I used a glittered white embossing powder as well as the clear shimmer powder. All the flakes started out as light blue. I added a couple layers of scrap chipboard to the back of the image to make it more sturdy.
.JPG)
And here is a look at the file I used : Just Chillin by Designs on Cloud9
Pictures/previews/links for this page have been removed due to designers retiring and stores closing
Here's a nice card I just finished! Quick and super easy to make, and I'm really pleased with how it turned out. Great for using up scraps, be they paper or fabric scraps. That strip of paper will look really cool if it were a strip of fabric, maybe gently frayed, especially if it is sewn along the edges. Same for the pin cushion, fabric would work great. I did not add pins as I need to mail this internationally, but I think a slightly stuffed pincushion complete with pins and a threaded needle would be fun to add. Then some real stitching/sewing, maybe even some fancy trim along the side of that strip in the background...or yes, that will look great...and the scissors cut from chipboard and painted silver....hmmmm ..so many possibilities.
.JPG)
The card design (as it is here) is from SVG-Cuts "Dress Shop"
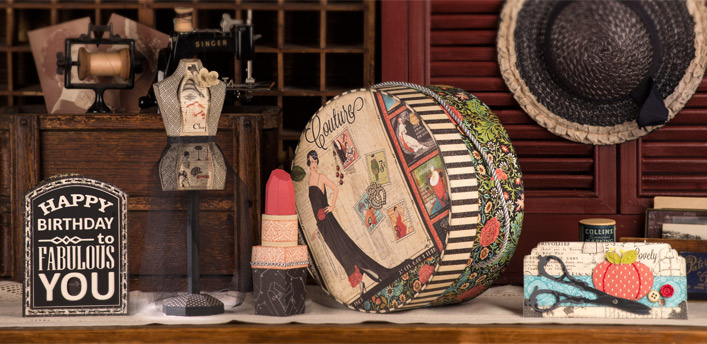
I can definitely see myself making more of these!

A nice summery card. Love the flowers, love the colours. Always reminds me of Hawai'i, even though we always had these in our garden, growing up. Funny how that is....
.JPG)
I used these Hibiscus cut files by Designs on Cloud9. The writing was done with the Cameo and a regular pen (not the Silhouette pens) and coloured with coloured pencils. Nice and easy.
Pictures/previews/links for this page have been removed due to designers retiring and stores closing
A young friend of ours started school this year! His family was very proud of him as he bravely and excitedly started on this new adventure. I thought a little card of encouragement would not go amiss, seeing as we were not able to be there in person with a hug, kiss and best wishes.
.JPG)
These little owls are simply adorable. (they will make great magnets too...oh dear, what have I started?!?) You can find the file here : Wise Guys in the Silhouette Store.

Have a friend who puts a smile on your face? I have several, but the 'You're a Hoot' set by Cloud 9 Designs reminded me of one in particular...so I made her this card. I wanted her to know she brightens my day!
.JPG)
.JPG)
Pictures/previews/links for this page have been removed due to designers retiring and stores closing
Feeling Crabby?
To me a cold or flu in the summer always seems to be worse than in the colder months, so I figured a fun and slightly silly card may put a smile on the face of an unlucky sufferer.
.JPG)
I used the crab from Designs on Cloud 9's - "Fin-Tastic Friends" - The writing was done with a pen in the Silhouette and coloured using coloured pencils.
I deleted his smile and added a sad face with black pen and put him on a patch of sand taken from "Surf Shack"
I like the slight dimension added by the layered cut-outs.
.JPG)
Hopefully my sad crab will add a bright moment to my unfortunate friend's day!
Another Quikie Card
I really like the look of these rose stamps that I picked up at the Dollar Tree near me. It includes 3 roses, of different sizes and two sprigs of leaves. The swirls behind the roses is from another Dollar Tree set. I've been checking to see if they will get more stamp sets in, but so far have had no luck. I'll be dropping by to make sure I do not miss out on anything though ;-) The sentiment stamp is from Hambo Stamps. It was from the retiring section and it looks like these particular ones are all sold out now. I coloured the rose and leaves with metallic water soluble pencils and the ink is Memento Dye Ink.
.JPG)
I'm very happy and excited to announce that I've been offered a spot on the Designs on Cloud 9 Design Team! I had to pinch myself really hard to believe it!
Not only does Michelle have the cutest designs, she has wonderful freebies, most weeks. This week's is an adorable Beach Penguin. Sign up for the newsletter to see all the weekly new designs, the Design Team work as well as the freebie!
Pictures/previews/links for this page have been removed due to designers retiring and stores closing
My first DT project was this card...I always seem to miss some birthdays in a year, and I figure I may as well make folks smile when I goof up.
.JPG)
The rabbit is from Wonderland Cuties. (Nobody is as fashionably late as the white rabbit from 'Alice in Wonderland!) and the speech bubble is from Word Bubbles. I added a few punched flowers and the font for the sentiment is LTD Hearth from Lettering Delights.
And inside the card...
.JPG)
I added the cake and some stars from Designs on Cloud 9's Monster Birthday.
I've got a bunch of ideas all clamoring for my attention....too little time for too much fun!
Thanks for stopping by, I hope you have a great weekend!
Now this studious looking little fella/girl is from the Kawaii Kalendar set by Lettering Delights. It was part of a bundle that had a few sets in that were on my wishlist. When bundled together like that the prices per set work out really reasonable. I didn't know when I would ever use any of these....untill I remembered my friend, who I needed a 'Thank You' card for, who loves pandas, and purple(hence the purple glasses). The rest was just plain fun. The sentiment is an older Provo Craft clear stamp. Love the texture on the note card which is from a multi colour pack I bought from Michaels years ago... I chalked the edges of the papers and added a few highlights. I think it adds a finishing touch to the final product!
.JPG)
.JPG)

And here is another card using the same Leaping Lizards Cut Set from Lettering Delights The writing was done with a Sharpie fineliner in the pen holder for the Silhouette. The font is LD Red Hatter's Hand. Of course it traces the outline which I then filled in in a 'casual' way. Meaning I wasn't trying to produce a solid black letter.
.JPG)
.JPG)
.JPG)
Ha! This one was a lot of fun to do. It took time, but surely it was worth it! ;-)
The lizard is from a Lettering Delights Collection called 'Leaping Lizards' and the unfortunate - LOL- bug is from the 'Bannerday' set that I got when I signed up at Lettering Delights.
.JPG)
I made the 'wooden planks' using Crackle Medium, that I still have, and 2 shades of brown paint on Kraft coloured card stock, but I do believe the look can be achieved using ordinary Elmer's glue. Haven't yet tried it since I have the product handy and may as well use it, before it is too old and no longer good. Here is a blog post explaining the process.
.JPG)
I used foam squares to pop the critters up a little more to add depth to the card front.
The writing on the banner is my own and I can customize the card inside to suit the 'bug' that was 'caught' (ie cold/flu) and the 'nails' were just little circle punches from a regular punch used to punch paper for folders. Nothing fancy there!
I -fortunately- have more cards on the list to make, so I'm on my way to 'go play' a little more...
Here is a recent birthday card. The stamp is a Dollar Store one. I really did not expect the rubber to last long, but I've had it now for many years and it is still going strong.
I like the idea of using the same image repeatedly...
.JPG)
The banner and single flower were both attached with foam tape. The 'Happy Birthday' stamp is another oldie..a clear stamp by ProvoCraft
Here another anniversary card I made recently. I had fun with it even if it turned out a wee bit clumsy.
Cut with the Silhouette Cameo (sentiment printed on the printer) using a file from Lettering Delights 'Great Scott It's Love'
.JPG)
and a close view
.JPG)
Win win!
Whoot!
Welcome to the 'Greeting Card' page on my craft blog!
I have a collection of 'oldies' cards to add to this page, but I thought would start with the latest card and work my way back.
This one went in the mail very recently - an anniversary card to family members. I used stamps from Penny Black's 'Every Which Way' set.
.JPG)
and the inside
.JPG)
I cut the laced heart, the bow and the red hearts with the Silhouette Cameo. The dotted paper is as old as the hills ;-) I found it in a folder of remnants. The image is coloured with Inktense pencils and although you can't see it here, I did use a red glitter pen over top of the roses to give them a shimmer.
I hope the recipients like it! It is pretty basic and 'flat' seeing as it needed to go in international mail, but the wishes are as warm as ever!
No comments:
Post a Comment